One of my favourite sorts of twitter accounts like Random Bobbinsverse and Random Hellboy that tweet out single panels for a comic. They add a little bit of joy to my timeline between the tweets about our current Grimdark reality.
Recently I’ve had a need to look into creating Twitter Chatbots and creating one of these panel posting bots seemed like a good example project.
Why call the bot A Chip of Culture? Alan Moore is said to refer to floppy comic book issues “a real slab of culture” (although I can now only find references to Warren Ellis saying Moore said it). If a full comic is a “slab” then a single panel would be a “chip”.
To get the panel posting bot working you’ll need the following:
- A Twitter account
- An application on Twitter (this requires you to have a Twitter Developer account)
- A MySQL database
- An agent on Dialogflow
- Python 3.7 (that’s what I have locally, may work on earlier versions YMMV)
Basic Bot
The core of the bot built off the back of the tutorial “How to Make a Twitter Bot in Python With Tweepy“. The tutorial results in a bot that can reply, favourite and follow. Once you’ve had a look at that, come back here and we’ll expand it to have a MySQL backend to hold some data and integrating with Dialog Flow to provide some smarts.
If you want to skip it, you can start with the code tagged “basicbot” in the repo for this bot.
Adding MySQL
Before we can interact with the database, the MySQL connector package needs to be installed:
pip install mysql-connector-python
To keep our boilerplate code for interacting with the database in the one place, we’ll create some helper functions around our calls – connect, fetchall, insert and update. You can see the code behind these in db/db_helper.py.
The database connection details should be set as environment variables for the connect function to use:
export DB_HOST="your_host"
export DB_NAME="your_database"
export DB_USER="someuser"
export DB_PASS="apassword"
The Panels Table
The first thing we want to store in the database is a list of comic panels that we will be posting. This table will contain all the information needed to post about a panel – who the creators are, what series, when it was published etc.. The only required field will be the id. Create the table using the following SQL:
CREATE TABLE `panels` (
  `id` int(11) NOT NULL AUTO_INCREMENT,
  `image_uri` varchar(1000) COLLATE utf8mb4_unicode_ci DEFAULT NULL,
  `twitter_media_id` varchar(20) COLLATE utf8mb4_unicode_ci DEFAULT NULL,
  `writer` varchar(255) COLLATE utf8mb4_unicode_ci DEFAULT NULL,
  `artist` varchar(255) COLLATE utf8mb4_unicode_ci DEFAULT NULL,
  `letterer` varchar(255) COLLATE utf8mb4_unicode_ci DEFAULT NULL,
  `colourist` varchar(255) COLLATE utf8mb4_unicode_ci DEFAULT NULL,
  `inks` varchar(255) CHARACTER SET utf8mb4 COLLATE utf8mb4_unicode_ci DEFAULT NULL,
  `series` varchar(255) COLLATE utf8mb4_unicode_ci DEFAULT NULL,
  `issue` int(11) DEFAULT NULL,
  `published` varchar(45) COLLATE utf8mb4_unicode_ci DEFAULT NULL,
  `last_used` datetime NOT NULL DEFAULT CURRENT_TIMESTAMP ON UPDATE CURRENT_TIMESTAMP,
  `number_of_uses` int(11) DEFAULT '0',
  PRIMARY KEY (`id`),
  UNIQUE KEY `id_UNIQUE` (`id`)
) ENGINE=InnoDB AUTO_INCREMENT=22 DEFAULT CHARSET=utf8mb4 COLLATE=utf8mb4_unicode_ci;
- id (int): Unique identifier for the row
- image_uri (varchar): Location in filesystem of the panel image
- twitter_media_id (varchar): Media id from Twitter after image is uploaded
- writer (varchar): Who was the writer on the comic
- artist (varchar): Who was the artist on the comic
- letterer (varchar): Who was the letterer on the comic
- colourist (varchar): Who was the colourist on the comic
- inks (varchar): Who inked the comic
- series (varchar): What series the panel appeared
- issue (int): What issue the panel was in
- published (varchar): When was the issue published
- last_used (datetime): When the panel was last posted
- number_of_uses (int): How many times the panel has been posted
We’ll create a class to map a row from the panels table into an object. This class will have a property which will generate the appropriate text describing the panel. As most of the columns are optional, this function will only include the relevant information.
class Panel:
    def __init__(self, details):
        self.id = details['id']
        self.image_uri = details['image_uri']
        self.twitter_media_id = details['twitter_media_id']
        self.writer = details['writer']
        self.artist = details['artist']
        self.letterer = details['letterer']
        self.colourist = details['colourist']
        self.inks = details['inks']
        self.series = details['series']
        self.issue = details['issue']
        self.published = details['published']
        self.last_used = details['last_used']
        self.number_of_uses = details['number_of_uses']

    @property
    def tweet_text(self):
        tweet_text = ""

        if self.letterer:
            tweet_text = f"L: {self.letterer} " + tweet_text

        if self.colourist:
            tweet_text = f"C: {self.colourist} " + tweet_text

        if self.artist:
            tweet_text = f"A: {self.artist} " + tweet_text

        if self.writer:
            tweet_text = f"W: {self.writer} " + tweet_text

        if len(tweet_text) > 0:
            tweet_text = "\n" + tweet_text

        if self.published:
            tweet_text = f"{self.published} " + tweet_text

        if self.issue:
            tweet_text = f"No. {self.issue} " + tweet_text

        if self.series:
            tweet_text = f"{self.series} " + tweet_text

        return tweet_text
When posting, we want to select a panel at random from the least used panels. This means that a panel will not be reused until all other panels have been shown. We’ll add a helper function called select_panel to perform the query, shuffle the results and return a Panel object.
def select_panel():
    logger.info("Selecting a panel")

    panel = None

    sql_select_Query = "SELECT * FROM panels WHERE number_of_uses = (SELECT MIN(number_of_uses) FROM panels)"

    records = fetchall(sql_select_Query)

    logger.info(f"Number of records available: {len(records)}")

    if len(records):
        shuffle(records)

        panel = Panel(records[0])

    return panel
When a panel is posted, we want to store the media id of the panel image (so we don’t have to keep uploading the same image multiple times) and increment the use count. To do this, we’ll add a function called update to the panel class.
    def update(self):
        logger.info("Updating a panel to mark used")

        self.number_of_uses = self.number_of_uses + 1

        sql_update_query = """Update panels set number_of_uses = %s, twitter_media_id = %s where id = %s"""
        inputData = (self.number_of_uses, self.twitter_media_id, self.id)
        update(sql_update_query, inputData)

        logger.info(f"Updated panel {self.id}")
Now that we can fetch a random panel and update that it has been used, let’s put it to use with a new script, autopostpanel.py.
#!/usr/bin/env python
# tweepy-bots/bots/autopostpanel.py

import tweepy
import logging
import time
import sys
import os
#This is so we can find out DB files
sys.path.append(os.path.dirname(os.path.abspath(__file__)) + '/../')

from config import create_api
from db.panel import select_panel

logging.basicConfig(level=logging.INFO)
logger = logging.getLogger()

def post_panel(api):
    logger.info("Attempt to post a panel")

    panel = select_panel()
    media_ids = None

    if panel:
        tweet_text = panel.tweet_text

        if not panel.twitter_media_id:
            media = api.media_upload(panel.image_uri)
            panel.twitter_media_id = media.media_id

        media_ids=[panel.twitter_media_id]
    else:
        tweet_text = "No panel available!"

    logger.info(f"Tweeting: {tweet_text}")

    tweet = api.update_status(
        status=tweet_text,
        media_ids=media_ids
    )

    panel.update()

    return tweet

def main():
    try:
        api = create_api()
        post_panel(api)
    except Exception as e:
        logger.error("Error on post", exc_info=True)

if __name__ == "__main__":
    main()
When this script is run, it fetches a random panel from the least used panels, uploads the panel (if it hasn’t been uploaded before), tweets it out and records the usage.
The updated code for this section is under the “postpanel” tag in the repo.
Recording Replies
In the current auto-reply script, it will forget what tweets have been replied to when it stops executing and will attempt to reply again on subsequent runs. This is less than ideal as it will only annoy people seeing the same thing over and over. To avoid this, we will record when a tweet has been replied to in the database.
Create the table to hold the tweet id of replied tweets with the following SQL:
CREATE TABLE `replies` (
  `id` int(11) NOT NULL AUTO_INCREMENT,
  `tweet_id` varchar(20) COLLATE utf8mb4_unicode_ci DEFAULT NULL,
  PRIMARY KEY (`id`)
) ENGINE=InnoDB DEFAULT CHARSET=utf8mb4 COLLATE=utf8mb4_unicode_ci;
To interact with this table, we will create two helper functions, last_reply to get the id of the last tweet that was replied to and did_reply to record that a tweet was replied to.
def have_replied(tweet_id):
    logger.info(f"Checking if tweet {tweet_id} has already been replied to")

    sql_select_Query = "SELECT * FROM replies WHERE tweet_id = %s LIMIT 1"

    records = fetchall(sql_select_Query, (tweet_id,))

    if records and len(records) > 0:
        return True
    return False

def did_reply(tweet_id):
    logger.info("Adding a tweet id to mark it replied")

    sql_insert_Query = "INSERT IGNORE INTO replies (tweet_id) VALUES (%s)"
    insert(sql_insert_Query, (tweet_id,))

def last_reply():
    logger.info("Get the id of the last tweet replied to")

    sql_select_Query = "SELECT * FROM ellis_panel.replies ORDER BY id DESC LIMIT 1"
    records = fetchall(sql_select_Query)

    logger.info(f"Number of records available: {len(records)}")

    if len(records) < 1:
        return 1
    return int(records[0]['tweet_id'])
The autoreply.py script needs to be updated to use these functions (see lines 37 and 43 below). For did_reply we pass through the id_str parameter of the tweet object rather than the 64-bit integer id.
#!/usr/bin/env python
# tweepy-bots/bots/autoreply.py

import tweepy
import logging
from config import create_api
import time
import sys
import os
#This is so we can find out DB files
sys.path.append(os.path.dirname(os.path.abspath(__file__)) + '/../')

from db.replies import last_reply, did_reply

logging.basicConfig(level=logging.INFO)
logger = logging.getLogger()

def check_mentions(api, keywords, since_id):
    logger.info("Retrieving mentions")
    new_since_id = since_id
    for tweet in tweepy.Cursor(api.mentions_timeline,
        since_id=since_id).items():
        new_since_id = max(tweet.id, new_since_id)
        if tweet.in_reply_to_status_id is not None:
            continue
        if any(keyword in tweet.text.lower() for keyword in keywords):
            logger.info(f"Answering to {tweet.user.name}")

            if not tweet.user.following:
                tweet.user.follow()

            api.update_status(
                status="Please reach us via DM",
                in_reply_to_status_id=tweet.id,
            )

            did_reply(tweet.id_str)

    return new_since_id

def main():
    api = create_api()
    since_id = last_reply()
    while True:
        since_id = check_mentions(api, ["help", "support"], since_id)
        logger.info("Waiting...")
        time.sleep(60)

if __name__ == "__main__":
    main()
When the script is run, it will ignore tweets that have already been replied to and avoid duplicates statuses (that would be rejected by the Twitter API anyway) and won’t annoy other users by bombarding them with the same response.
The updated code for this section is under the “recordreply” tag in the repo.
Integrating with Dialogflow
Now that we know when we’ve responded to a mention, let’s make our responses a little more intelligent by passing them through Dialogflow.
If you haven’t already, sign up to Dialogflow and login to the console.
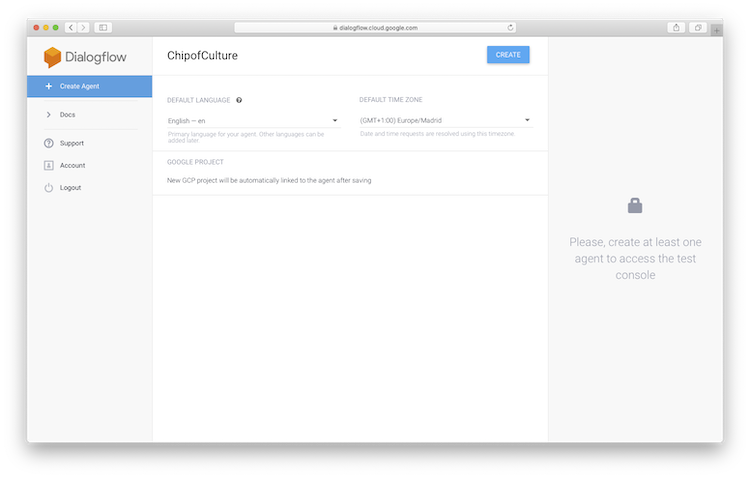
An agent needs to be created to mange the interactions. Hit ‘Create Agent’. Call the agent ‘ChipofCulture’ (no white space is allowed in the name) and hit ‘Create’. All the other options are configurable later in the settings page.
We now have an agent but it will only respond to the default questions. To correctly respond to mentions, we need to set up intents that will interpret what has been said and respond appropriately. The intent we will set up is to figure out when the bot has been asked to send a panel.
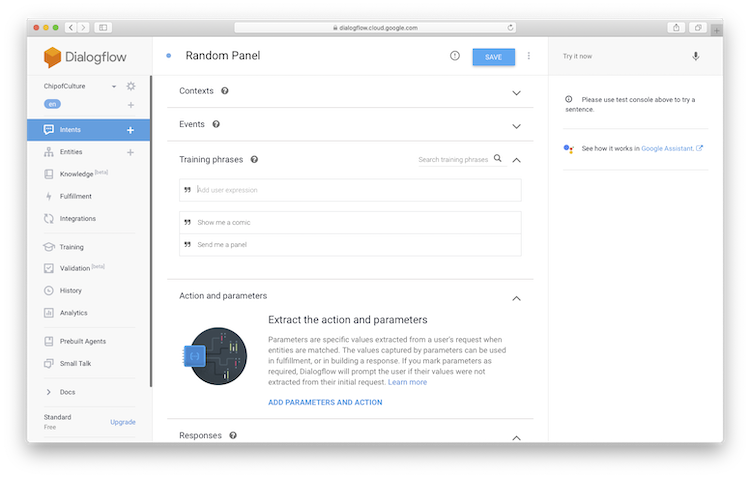
Click ‘Create Intent’. Call the intent ‘Random Panel’. Before the intent can be triggered, some example phrases need to be added. Based on these training phrases the agent will try and match was is sent to it and return the appropriate intent. Click ‘Add Training Phrase’. Enter ‘Show me a comic’ and ‘Send me a panel’. Hit ‘Save’.
You can test the intent by typing into the input box on the top right. If you enter ‘show me a panel’ (a combination of our two phrases) you will see that the correct intent is picked up.
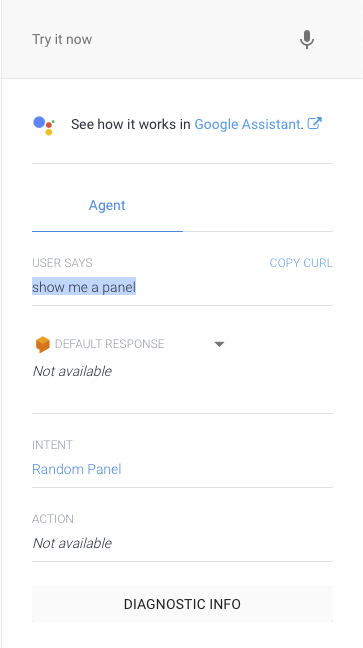
The last piece is to add an action to the intent. this action will be used later in our scripts. Click ‘Add Parameters and Action’. Put ‘send_panel’ in the ‘Enter action name’ input box. Hit ‘Save’. Test the intent again and you’ll see the action is filled out.
If you hit the ‘Diagnostic Info’ button after testing your intent, you will see the raw JSON that will be retuned by the API.
We’re now ready to access the agent from our scripts. To open up API access, it must be turned on via the Google Cloud console. Once you are logged into the console, select APIs & Services. Click on ‘Enable APIs and Services’ and search for Dialog Flow and activate the API.
To access the API, you’ll need to create a service account to authenticate against. Download the json file and open it up. Find the key ‘client_email’ and note the generated address. Go to the Google Cloud console and click on ‘IAM’. If the e-mail address from your json file isn’t listed, click ‘add’. Enter the e-mail address in ‘New Member’ and for ‘select a role’, search for ‘Dialogflow API Client’ and click ‘Save’.
Once all this is setup, we need to install the Dialogflow package and other supporting Google packages for Python:
 pip install dialogflow
pip install google-auth
pip install google-cloud-storage
We now need to add a function that will take the text from a mention, pass it to Dialogflow and figure out what to do with the response.
#!/usr/bin/env python
# tweepy-bots/df/df_helper.py

import logging

logging.basicConfig(level=logging.INFO)
logger = logging.getLogger()

def detect_intent_texts(project_id, session_id, text, language_code):
    """Returns the result of detect intent with texts as inputs.

    Using the same `session_id` between requests allows continuation
    of the conversation."""
    import dialogflow_v2 as dialogflow
    from google.protobuf.json_format import MessageToDict

    session_client = dialogflow.SessionsClient()

    session = session_client.session_path(project_id, session_id)

    text_input = dialogflow.types.TextInput(text=text,
        language_code=language_code)

    query_input = dialogflow.types.QueryInput(text=text_input)

    response = session_client.detect_intent(session=session,
        query_input=query_input)

    return MessageToDict(response.query_result)
The response from the API is turned from a protocol buffer object into JSON before being returned.
To use the function, we call it with our agent’s project id, a session key (we’re using a freshly generated UUID), the text of the tweet and a language encoding which we’ll take from the language set in the tweet.
You find the project id on the settings page accessed by clicking on the cog icon and will be stored as an environment variable:
export DIALOGFLOW_PROJECT_ID="your-project-id"
The UUID is if we want to expand out capabilities and be able to keep a session going with the agent. Using this is left as an exercise for the reader.
The autoreply.py script is updated with this function call. The result returned is checked for the send_panel action
def check_mentions(api, since_id):
    logger.info("Retrieving mentions")
    new_since_id = since_id
    for tweet in tweepy.Cursor(api.mentions_timeline,
        since_id=since_id).items():
        new_since_id = max(tweet.id, new_since_id)
        if tweet.in_reply_to_status_id is not None:
            continue

        result = detect_intent_texts(dialogflow_project_key, str(uuid.uuid4()), tweet.text, tweet.lang)

        if result['action'] == 'send_panel':
            logger.info(f"Answering to {tweet.user.name}")

            if not tweet.user.following:
                tweet.user.follow()

            post_panel(api, username=tweet.user.screen_name, reply_tweet_id=tweet.id)

            did_reply(tweet.id_str)

    return new_since_id
Based then on the action set in the response, we can do the appropriate thing, which here is to send a random comic panel.
The post_panel function in autopostpanel.py has changed slightly, to accept an optional Twitter handle and tweet id to use when posting a tweet. This allows for a threaded reply rather than just a random dangling tweet.
def post_panel(api, username=None, reply_tweet_id=None):
    logger.info("Attempt to post a panel")

    panel = select_panel()
    media_ids = None

    if panel:
        tweet_text = panel.tweet_text

        if not panel.twitter_media_id:
            media = api.media_upload(panel.image_uri)
            panel.twitter_media_id = media.media_id

        media_ids=[panel.twitter_media_id]
    else:
        tweet_text = "No panel available!"

    if username:
        tweet_text = f"@{username} " + tweet_text

    logger.info(f"Tweeting: {tweet_text}")

    tweet = api.update_status(
        status=tweet_text,
        media_ids=media_ids,
        in_reply_to_status_id=reply_tweet_id,
    )

    panel.update()

    return tweet
Now when there is a tweet in the bot’s mentions that asks for a panel, the bot will reply directly to that tweet.
The updated code for this section is under the “adddialogflow” tag in the repo.
Conclusion
In this tutorial, we’ve expanded on a basic Twitter bot to add some state so it remembers what has been replied and given it some smarts to reply sensibly.
More intents can be easily added to the Dialogflow agent so you can respond to other questions such as asking the bot what artists does it know about or to send a panel from a particular series.
The code is available on Github in the repo achipofculture and active on the EllisPanelBot Twitter account.