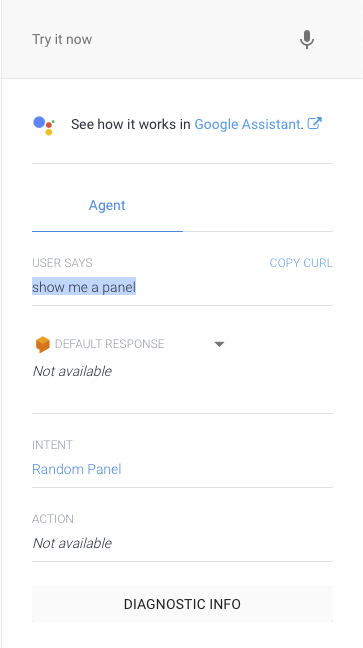
Create ML – Training Data Error

When importing a folder of images into Create ML, you may encounter the following error message:

Training Data Error

Empty table from specified data source

What this seems to actually mean is that there is something in the folder that is not:

  • an image
  • a JSON file with annotations for the images

If, for example, you are using RectLabel to annotate your images, there will also be an annotations folder with your images. You will need to remove this before the folder can be processed.

Once you’ve cleaned up your images folder, hit Rescan and they should be read properly and you can proceed to train your model.

A Chip of Culture – a Comic Panel Posting Twitter Bot

One of my favourite sorts of twitter accounts like Random Bobbinsverse and Random Hellboy that tweet out single panels for a comic. They add a little bit of joy to my timeline between the tweets about our current Grimdark reality. 

Recently I’ve had a need to look into creating Twitter Chatbots and creating one of these panel posting bots seemed like a good example project.

Why call the bot A Chip of Culture? Alan Moore is said to refer to floppy comic book issues “a real slab of culture” (although I can now only find references to Warren Ellis saying Moore said it). If a full comic is a “slab” then a single panel would be a “chip”.

To get the panel posting bot working you’ll need the following:

Basic Bot

The core of the bot built off the back of the tutorial “How to Make a Twitter Bot in Python With Tweepy“. The tutorial results in a bot that can reply, favourite and follow. Once you’ve had a look at that, come back here and we’ll expand it to have a MySQL backend to hold some data and integrating with Dialog Flow to provide some smarts.

If you want to skip it, you can start with the code tagged “basicbot” in the repo for this bot.

Adding MySQL

Before we can interact with the database, the MySQL connector package needs to be installed:

pip install mysql-connector-python

To keep our boilerplate code for interacting with the database in the one place, we’ll create some helper functions around our calls – connect, fetchall, insert and update. You can see the code behind these in db/db_helper.py.

The database connection details should be set as environment variables for the connect function to use:

export DB_HOST="your_host"
export DB_NAME="your_database"
export DB_USER="someuser"
export DB_PASS="apassword"

The Panels Table

The first thing we want to store in the database is a list of comic panels that we will be posting. This table will contain all the information needed to post about a panel – who the creators are, what series, when it was published etc.. The only required field will be the id. Create the table using the following SQL:

CREATE TABLE `panels` (
  `id` int(11) NOT NULL AUTO_INCREMENT,
  `image_uri` varchar(1000) COLLATE utf8mb4_unicode_ci DEFAULT NULL,
  `twitter_media_id` varchar(20) COLLATE utf8mb4_unicode_ci DEFAULT NULL,
  `writer` varchar(255) COLLATE utf8mb4_unicode_ci DEFAULT NULL,
  `artist` varchar(255) COLLATE utf8mb4_unicode_ci DEFAULT NULL,
  `letterer` varchar(255) COLLATE utf8mb4_unicode_ci DEFAULT NULL,
  `colourist` varchar(255) COLLATE utf8mb4_unicode_ci DEFAULT NULL,
  `inks` varchar(255) CHARACTER SET utf8mb4 COLLATE utf8mb4_unicode_ci DEFAULT NULL,
  `series` varchar(255) COLLATE utf8mb4_unicode_ci DEFAULT NULL,
  `issue` int(11) DEFAULT NULL,
  `published` varchar(45) COLLATE utf8mb4_unicode_ci DEFAULT NULL,
  `last_used` datetime NOT NULL DEFAULT CURRENT_TIMESTAMP ON UPDATE CURRENT_TIMESTAMP,
  `number_of_uses` int(11) DEFAULT '0',
  PRIMARY KEY (`id`),
  UNIQUE KEY `id_UNIQUE` (`id`)
) ENGINE=InnoDB AUTO_INCREMENT=22 DEFAULT CHARSET=utf8mb4 COLLATE=utf8mb4_unicode_ci;
  • id (int): Unique identifier for the row
  • image_uri (varchar): Location in filesystem of the panel image
  • twitter_media_id (varchar): Media id from Twitter after image is uploaded
  • writer (varchar): Who was the writer on the comic
  • artist (varchar): Who was the artist on the comic
  • letterer (varchar): Who was the letterer on the comic
  • colourist (varchar): Who was the colourist on the comic
  • inks (varchar): Who inked the comic
  • series (varchar): What series the panel appeared
  • issue (int): What issue the panel was in
  • published (varchar): When was the issue published
  • last_used (datetime): When the panel was last posted
  • number_of_uses (int): How many times the panel has been posted

We’ll create a class to map a row from the panels table into an object. This class will have a property which will generate the appropriate text describing the panel. As most of the columns are optional, this function will only include the relevant information.

class Panel:
    def __init__(self, details):
        self.id = details['id']
        self.image_uri = details['image_uri']
        self.twitter_media_id = details['twitter_media_id']
        self.writer = details['writer']
        self.artist = details['artist']
        self.letterer = details['letterer']
        self.colourist = details['colourist']
        self.inks = details['inks']
        self.series = details['series']
        self.issue = details['issue']
        self.published = details['published']
        self.last_used = details['last_used']
        self.number_of_uses = details['number_of_uses']

    @property
    def tweet_text(self):
        tweet_text = ""

        if self.letterer:
            tweet_text = f"L: {self.letterer} " + tweet_text

        if self.colourist:
            tweet_text = f"C: {self.colourist} " + tweet_text

        if self.artist:
            tweet_text = f"A: {self.artist} " + tweet_text

        if self.writer:
            tweet_text = f"W: {self.writer} " + tweet_text

        if len(tweet_text) > 0:
            tweet_text = "\n" + tweet_text

        if self.published:
            tweet_text = f"{self.published} " + tweet_text

        if self.issue:
            tweet_text = f"No. {self.issue} " + tweet_text

        if self.series:
            tweet_text = f"{self.series} " + tweet_text

        return tweet_text

When posting, we want to select a panel at random from the least used panels. This means that a panel will not be reused until all other panels have been shown. We’ll add a helper function called select_panel to perform the query, shuffle the results and return a Panel object.

def select_panel():
    logger.info("Selecting a panel")

    panel = None

    sql_select_Query = "SELECT * FROM panels WHERE number_of_uses = (SELECT MIN(number_of_uses) FROM panels)"

    records = fetchall(sql_select_Query)

    logger.info(f"Number of records available: {len(records)}")

    if len(records):
        shuffle(records)

        panel = Panel(records[0])

    return panel

When a panel is posted, we want to store the media id of the panel image (so we don’t have to keep uploading the same image multiple times) and increment the use count. To do this, we’ll add a function called update to the panel class.

    def update(self):
        logger.info("Updating a panel to mark used")

        self.number_of_uses = self.number_of_uses + 1

        sql_update_query = """Update panels set number_of_uses = %s, twitter_media_id = %s where id = %s"""
        inputData = (self.number_of_uses, self.twitter_media_id, self.id)
        update(sql_update_query, inputData)

        logger.info(f"Updated panel {self.id}")

Now that we can fetch a random panel and update that it has been used, let’s put it to use with a new script, autopostpanel.py.

#!/usr/bin/env python
# tweepy-bots/bots/autopostpanel.py

import tweepy
import logging
import time
import sys
import os
#This is so we can find out DB files
sys.path.append(os.path.dirname(os.path.abspath(__file__)) + '/../')

from config import create_api
from db.panel import select_panel

logging.basicConfig(level=logging.INFO)
logger = logging.getLogger()

def post_panel(api):
    logger.info("Attempt to post a panel")

    panel = select_panel()
    media_ids = None

    if panel:
        tweet_text = panel.tweet_text

        if not panel.twitter_media_id:
            media = api.media_upload(panel.image_uri)
            panel.twitter_media_id = media.media_id

        media_ids=[panel.twitter_media_id]
    else:
        tweet_text = "No panel available!"

    logger.info(f"Tweeting: {tweet_text}")

    tweet = api.update_status(
        status=tweet_text,
        media_ids=media_ids
    )

    panel.update()

    return tweet

def main():
    try:
        api = create_api()
        post_panel(api)
    except Exception as e:
        logger.error("Error on post", exc_info=True)

if __name__ == "__main__":
    main()

When this script is run, it fetches a random panel from the least used panels, uploads the panel (if it hasn’t been uploaded before), tweets it out and records the usage.

The updated code for this section is under the “postpanel” tag in the repo.

Recording Replies

In the current auto-reply script, it will forget what tweets have been replied to when it stops executing and will attempt to reply again on subsequent runs. This is less than ideal as it will only annoy people seeing the same thing over and over. To avoid this, we will record when a tweet has been replied to in the database.

Create the table to hold the tweet id of replied tweets with the following SQL:

CREATE TABLE `replies` (
  `id` int(11) NOT NULL AUTO_INCREMENT,
  `tweet_id` varchar(20) COLLATE utf8mb4_unicode_ci DEFAULT NULL,
  PRIMARY KEY (`id`)
) ENGINE=InnoDB DEFAULT CHARSET=utf8mb4 COLLATE=utf8mb4_unicode_ci;

To interact with this table, we will create two helper functions, last_reply to get the id of the last tweet that was replied to and did_reply to record that a tweet was replied to.

def have_replied(tweet_id):
    logger.info(f"Checking if tweet {tweet_id} has already been replied to")

    sql_select_Query = "SELECT * FROM replies WHERE tweet_id = %s LIMIT 1"

    records = fetchall(sql_select_Query, (tweet_id,))

    if records and len(records) > 0:
        return True
    return False

def did_reply(tweet_id):
    logger.info("Adding a tweet id to mark it replied")

    sql_insert_Query = "INSERT IGNORE INTO replies (tweet_id) VALUES (%s)"
    insert(sql_insert_Query, (tweet_id,))

def last_reply():
    logger.info("Get the id of the last tweet replied to")

    sql_select_Query = "SELECT * FROM ellis_panel.replies ORDER BY id DESC LIMIT 1"
    records = fetchall(sql_select_Query)

    logger.info(f"Number of records available: {len(records)}")

    if len(records) < 1:
        return 1
    return int(records[0]['tweet_id'])

The autoreply.py script needs to be updated to use these functions (see lines 37 and 43 below). For did_reply we pass through the id_str parameter of the tweet object rather than the 64-bit integer id.

#!/usr/bin/env python
# tweepy-bots/bots/autoreply.py

import tweepy
import logging
from config import create_api
import time
import sys
import os
#This is so we can find out DB files
sys.path.append(os.path.dirname(os.path.abspath(__file__)) + '/../')

from db.replies import last_reply, did_reply

logging.basicConfig(level=logging.INFO)
logger = logging.getLogger()

def check_mentions(api, keywords, since_id):
    logger.info("Retrieving mentions")
    new_since_id = since_id
    for tweet in tweepy.Cursor(api.mentions_timeline,
        since_id=since_id).items():
        new_since_id = max(tweet.id, new_since_id)
        if tweet.in_reply_to_status_id is not None:
            continue
        if any(keyword in tweet.text.lower() for keyword in keywords):
            logger.info(f"Answering to {tweet.user.name}")

            if not tweet.user.following:
                tweet.user.follow()

            api.update_status(
                status="Please reach us via DM",
                in_reply_to_status_id=tweet.id,
            )

            did_reply(tweet.id_str)

    return new_since_id

def main():
    api = create_api()
    since_id = last_reply()
    while True:
        since_id = check_mentions(api, ["help", "support"], since_id)
        logger.info("Waiting...")
        time.sleep(60)

if __name__ == "__main__":
    main()

When the script is run, it will ignore tweets that have already been replied to and avoid duplicates statuses (that would be rejected by the Twitter API anyway) and won’t annoy other users by bombarding them with the same response.

The updated code for this section is under the “recordreply” tag in the repo.

Integrating with Dialogflow

Now that we know when we’ve responded to a mention, let’s make our responses a little more intelligent by passing them through Dialogflow.

If you haven’t already, sign up to Dialogflow and login to the console.

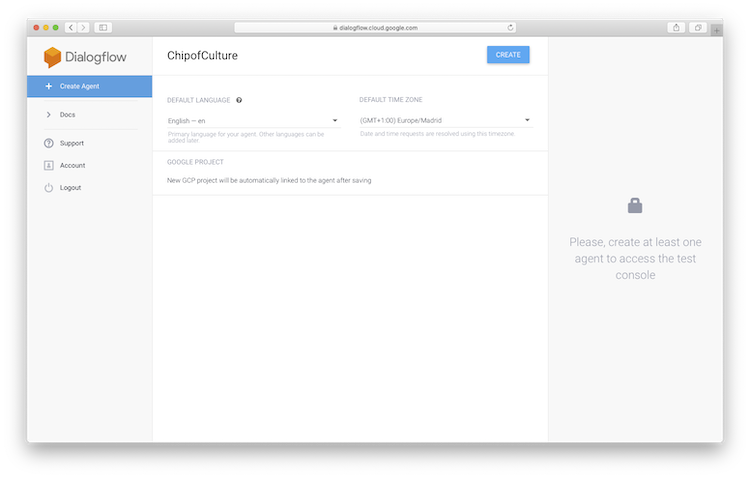
An agent needs to be created to mange the interactions. Hit ‘Create Agent’. Call the agent ‘ChipofCulture’ (no white space is allowed in the name) and hit ‘Create’. All the other options are configurable later in the settings page.

We now have an agent but it will only respond to the default questions. To correctly respond to mentions, we need to set up intents that will interpret what has been said and respond appropriately. The intent we will set up is to figure out when the bot has been asked to send a panel.

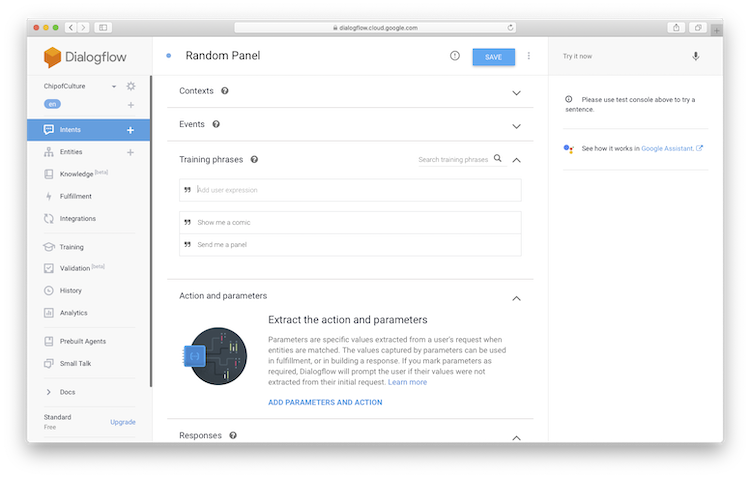
Click ‘Create Intent’. Call the intent ‘Random Panel’. Before the intent can be triggered, some example phrases need to be added. Based on these training phrases the agent will try and match was is sent to it and return the appropriate intent. Click ‘Add Training Phrase’. Enter ‘Show me a comic’ and ‘Send me a panel’. Hit ‘Save’.

You can test the intent by typing into the input box on the top right. If you enter ‘show me a panel’ (a combination of our two phrases) you will see that the correct intent is picked up.

The last piece is to add an action to the intent. this action will be used later in our scripts. Click ‘Add Parameters and Action’. Put ‘send_panel’ in the ‘Enter action name’ input box. Hit ‘Save’. Test the intent again and you’ll see the action is filled out.

If you hit the ‘Diagnostic Info’ button after testing your intent, you will see the raw JSON that will be retuned by the API.

We’re now ready to access the agent from our scripts. To open up API access, it must be turned on via the Google Cloud console. Once you are logged into the console, select APIs & Services. Click on ‘Enable APIs and Services’ and search for Dialog Flow and activate the API.

To access the API, you’ll need to create a service account to authenticate against. Download the json file and open it up. Find the key ‘client_email’ and note the generated address. Go to the Google Cloud console and click on ‘IAM’. If the e-mail address from your json file isn’t listed, click ‘add’. Enter the e-mail address in ‘New Member’ and for ‘select a role’, search for ‘Dialogflow API Client’ and click ‘Save’.

Once all this is setup, we need to install the Dialogflow package and other supporting Google packages for Python:

 pip install dialogflow
pip install google-auth 
pip install google-cloud-storage 

We now need to add a function that will take the text from a mention, pass it to Dialogflow and figure out what to do with the response.

#!/usr/bin/env python
# tweepy-bots/df/df_helper.py

import logging

logging.basicConfig(level=logging.INFO)
logger = logging.getLogger()

def detect_intent_texts(project_id, session_id, text, language_code):
    """Returns the result of detect intent with texts as inputs.

    Using the same `session_id` between requests allows continuation
    of the conversation."""
    import dialogflow_v2 as dialogflow
    from google.protobuf.json_format import MessageToDict

    session_client = dialogflow.SessionsClient()

    session = session_client.session_path(project_id, session_id)

    text_input = dialogflow.types.TextInput(text=text,
        language_code=language_code)

    query_input = dialogflow.types.QueryInput(text=text_input)

    response = session_client.detect_intent(session=session,
        query_input=query_input)

    return MessageToDict(response.query_result)

The response from the API is turned from a protocol buffer object into JSON before being returned.

To use the function, we call it with our agent’s project id, a session key (we’re using a freshly generated UUID), the text of the tweet and a language encoding which we’ll take from the language set in the tweet.

You find the project id on the settings page accessed by clicking on the cog icon and will be stored as an environment variable:

export DIALOGFLOW_PROJECT_ID="your-project-id"

The UUID is if we want to expand out capabilities and be able to keep a session going with the agent. Using this is left as an exercise for the reader.

The autoreply.py script is updated with this function call. The result returned is checked for the send_panel action

def check_mentions(api, since_id):
    logger.info("Retrieving mentions")
    new_since_id = since_id
    for tweet in tweepy.Cursor(api.mentions_timeline,
        since_id=since_id).items():
        new_since_id = max(tweet.id, new_since_id)
        if tweet.in_reply_to_status_id is not None:
            continue

        result = detect_intent_texts(dialogflow_project_key, str(uuid.uuid4()), tweet.text, tweet.lang)

        if result['action'] == 'send_panel':
            logger.info(f"Answering to {tweet.user.name}")

            if not tweet.user.following:
                tweet.user.follow()

            post_panel(api, username=tweet.user.screen_name, reply_tweet_id=tweet.id)

            did_reply(tweet.id_str)

    return new_since_id

Based then on the action set in the response, we can do the appropriate thing, which here is to send a random comic panel.

The post_panel function in autopostpanel.py has changed slightly, to accept an optional Twitter handle and tweet id to use when posting a tweet. This allows for a threaded reply rather than just a random dangling tweet.

def post_panel(api, username=None, reply_tweet_id=None):
    logger.info("Attempt to post a panel")

    panel = select_panel()
    media_ids = None

    if panel:
        tweet_text = panel.tweet_text

        if not panel.twitter_media_id:
            media = api.media_upload(panel.image_uri)
            panel.twitter_media_id = media.media_id

        media_ids=[panel.twitter_media_id]
    else:
        tweet_text = "No panel available!"

    if username:
        tweet_text = f"@{username} " + tweet_text

    logger.info(f"Tweeting: {tweet_text}")

    tweet = api.update_status(
        status=tweet_text,
        media_ids=media_ids,
        in_reply_to_status_id=reply_tweet_id,
    )

    panel.update()

    return tweet

Now when there is a tweet in the bot’s mentions that asks for a panel, the bot will reply directly to that tweet.

The updated code for this section is under the “adddialogflow” tag in the repo.

Conclusion

In this tutorial, we’ve expanded on a basic Twitter bot to add some state so it remembers what has been replied and given it some smarts to reply sensibly.

More intents can be easily added to the Dialogflow agent so you can respond to other questions such as asking the bot what artists does it know about or to send a panel from a particular series.

The code is available on Github in the repo achipofculture and active on the EllisPanelBot Twitter account.
An example of the bot tweeting out a panel.

CBPWordPress – Display content from your WordPress blog in an iOS app

CBPWordPress is an iOS library that will allow you to easily include content from a WordPress blog. The library can fetch lists of posts, individual posts and submit comments.

It is, of course, available on GitHub under the MIT License as well as via CocoaPods.

Background

Over the last few years, I’ve built an maintained the accompanying iOS app for Broadsheet.ie. It’s nearly tradition now for me to release a new version every year

The Example App

Included in the repo is an example app that is the basis for the new Broadsheet.ie app. This app will allow you to browse the site content, search for posts and submit comments.

The app also refreshes itself in the background, reminds the user of its existence in the morning and evenings and updates the logo on the home screen every 6 hours.

The full app includes Google Analytics and Mobile Ad SDK, Crashlytics and Conveser.io and has its own fork.

Installing the Plugin

Before you can use CBPWordPress, you must install the WP-JSON-API plugin to provide the data to the app. This is a slightly modified fork that provides a few extra fields to make things a bit smoother for the app.

If you want to be able to submit comments via the app, remember to turn on the Respond controller in the JSON API settings section.

Getting Started With The Example

Check out the repo from GitHub and initialise the Example pods:

git clone https://github.com/kmonaghan/CBPWordPress.git
cd CBPWordPress/Example
pod install

If you open the example project workspace and build and run the app, it should pull the latest 10 posts from Broadsheet.ie.

Using CBPWordPress In Your Own App

CocoaPods

The easiest way to use CBPWordPress is to install it via CocoaPods. To do that, just add the following line to your Podfile and then run ‘pod update’.

pod 'CBPWordPress'

Add the CBPWordPress project to your project

If you don’t use CocoaPods, add all the files in the CBPWordPress folder to your project. Then simply include the CBPWordPress.h header file where you want to use the library.

Note that you will also have to include AFNetworking in your project.

Usage

Pointing the library at your own WordPress installation is trivial. The first call to the library should be to set the root URL for the API.

[CBPWordPressAPIClient rootURI:@"http://YOUR-API-URL];

Once that is set, the calls to the API will use that URL.

Fetching A List Of Posts

To get a list of posts, you use the fetchPostsWithParams:withBlock: method from the NSURLSessionDataTask category.

In the example below, the first page of the recent posts is retrieved and the posts assigned to an array.

__weak typeof(self) weakSelf = self;

[NSURLSessionDataTask fetchPostsWithParams:@{@"page": @(1)}
withBlock:^(CBPWordPressPostsContainer *data, NSError *error) {
if (error) {
//Handle Error
return;
}

__strong typeof(weakSelf) strongSelf = weakSelf;

strongSelf.posts = data.posts;
}];

The allowed parameters are:

  • page: The page you want to fetch. Starts at 1.
  • count: The number of posts to retrieve. Defaults to 10.

Fetching A Post

If you know the post id, you can fetch a post using the fetchPostWithId:withBlock: method from the NSURLSessionDataTask category. The example below fetches post 1234 and assigns it to a local post variable.


__weak typeof(self) weakSelf = self;

[NSURLSessionDataTask fetchPostWithId:1234
withBlock:^(CBPWordPressPost *post, NSError *error){
if (error) {
//Handle Error
return;
}

__strong typeof(weakSelf) strongSelf = weakSelf;

strongSelf.post = post;
}];

If you have the URL of the post, you can use the fetchPostWithURL:withBlock: method instead. You pass the full URL of the post as the parameter.

Comment On A Post

To comment on a post, the postComment:withBlock: method from the NSURLSessionDataTask category is used. The method takes a CBPWordPressComment object as the first parameter. Below is an example comment being initialised.

CBPWordPressComment *newComment = [CBPWordPressComment new];
newComment.postId = 1234;
newComment.email = @"example@example.com";
newComment.name = @"Jonny Appleseed";
newComment.content = @"This is a comment!";
//Optional
newComment.url = @"http://somewebsite.com";
//If the comment is replying to another comment
newComment.parent = 1234;

Note that the URL and parent properties are optional but everything else is required. The parent property should be only be set if the user is replying to a comment and should be that comment’s id.

Once the comment is initialised, pass it to the postComment:withBlock: method. In the following example, the new comment is submitted and on success is set to the returned comment object.

__weak typeof(self) weakSelf = self;

[NSURLSessionDataTask postComment:newComment
withBlock:^(CBPWordPressComment *comment, NSError *error){
__strong typeof(weakSelf) strongSelf = weakSelf;

if (error) {
//Handle error
return;
}

strongSelf.comment = newComment;

Known issue: if WordPress detects a duplicate comment, the resulting return is HTML rather than JSON.

To Do

The library is very much a work in progress. Some of the planned functionality to add is:

  • Add option to fetch data from WP-API plugin
  • Implement helper methods for each WP-JSON-API endpoint (get_category_posts, get_tag_posts etc.)
  • Add a Today Extension to the example app

Contributing

Contributions via pull requests and suggestions are also welcome (although no promises that anything will be added).

If you do use this for your own app, I’d love to hear from you.

Creating an iOS Framework and Today Extension

One of the exciting new things announced at the WWDC keynote this month was App Extensions. This really opens up inter-app communication as well as letting developers do interesting things with the notification center and sharing.

I’m convinced that pretty much every news organisation is going have a widget included in their app to show the latest couple of stories. To that end, I’m going show here how I added a Today widget to a simplified version of the Broadsheet app.

All the code talked about here is available on GitHub under the MIT license.

Caveats:

  • This all works in the simulator but has not been tested on a device yet  Kindly tested by Liam Dunne and it works (phew!)
  • Some of the cell layouts are a bit off but are good enough for informational purposes
  • This is still all in Obj-C rather than being all cool and done in Swift

Starting off

Our starting point is a simple app that grabs the JSON feed of the latest 10 posts Broadsheet.ie and displays them in a UITableView. Tapping on a cell brings you to a screen that displays the content of the post in a UITextView (this will sometimes be mangled due to the content).

To this app we’re going to add a Today widget that displays the latest two post and brings you back to the app when a cell is tapped.

The base app is in the (imaginatively called) ‘baseapp‘ branch.

Creating The Framework

First, we’re going to create a framework to hold the common files that will be used by both the app and the widget. We need to add a framework target to the project by doing the following:

  • Select the project
  • Editor->Add Target
  • Select ‘Framework & Library’
  • Select ‘Cocoa Touch Framework’ and hit ‘Next’
  • Give it a name (ours is called CBPKit) and hit ‘Finish’

The framework should be automatically included in your app target (check under ‘Link Binary With Libraries’ in ‘Build Phases’).

Move any files you want your framework to provide from your app to the framework (note that this doesn’t move the files on disk). In this case it is everything but the view controllers.

Select the headers and in the ‘Utilities’ pane select your framework and set the option on the right to ‘project’.

Select the implementation files and again in the ‘Utilities’ pane select your framework and unselect your project.

For displaying the images in the cells, I’m using SDWebImage. I could have just add the relevant SDWebImage files to the framework I just created, but this seems wrong to me as:

  • You may include another framework in the future that includes and exposes SDWebImage and then you’d have a clash
  • You release your framework and someone can’t use it because your included version of SDWebImage clashes with the version they want to use
  • SDWebImage may release its own framework in the future

Instead, I created a separate framework (with the exact same steps as above) called SDWebImageKit.

As I may want to use this framework in another project, I set the headers to ‘Public’ in the ‘Utilities’ pane and added each of the headers to the framework header file. This means that I can import all the headers at once using:

#import <SDWebImageKit/SDWebImageKit.h>

When you run the app now, it should look no different to before despite the internal changes.

If you switch to the ‘framework‘ branch, you’ll see this built on top of the previous branch.

Today Extension

Like the framework, we first add a Extension target to the project.

  • Select the project
  • Editor->Add Target
  • Select ‘Application Extension’
  • Select ‘Today Extension’ and hit ‘Next’
  • Put in a name (ours is called CBPTodayExtensionExample) and hit ‘Next’
  • Go into Build Phases and include both the frameworks from above in the ‘Link Binary With Libraries’

If you run the project now in the simulator and pull down the notifications drawer, you should see ‘1 New Widget Available’ at the very bottom. Tapping on ‘Edit’ will bring up all the available widgets and the new widget should be at the bottom with a green plus beside it. Tap the plus and it should be displayed with any other active widgets when you hit ‘Done’.

‘Hello world’ is a nice greeting but we want to replace this with a table containing 2 tappable cells containing the latest two posts from Broadsheet.

I don’t use storyboards, so I removed the default one added by the template. In info.plist I removed the key NSExtensionMainStoryboard and replaced it with NSExtensionPrincipalClass and put ‘TodayViewController’ as the value.

The cell I use in the app is a bit big for displaying in the notification center, so I added a set of new constraints to display a more compact cell. This means I can reuse the same data source and cell from the main app in my Today extension with just some minor modifications.

In the TodayViewController, there are two places that need to load data from the network – when the widget is created and when widgetPerformUpdateWithCompletionHandler is called. For the former, I load posts in viewDidLoad, so that they should be ready by the time the widget displays. When iOS thinks the widget will be displayed to the user after it has been first displayed, widgetPerformUpdateWithCompletionHandler is called giving the widget a chance to update the posts displayed.

In this example, both cells are always reloaded even if they already contain the posts returned. It probably shouldn’t do this and instead only replace the updated cells, but that’s a bit of extra polish I’ll leave for when building the full widget.

To get the app to open when a cell is tapped, a custom URL scheme is registered in the base app and this can be called using the UIViewController’s extensionContext to open the URL.

If you switch to the ‘todayextension‘ branch, you’ll see this built on top of the framework branch.

Finally

To keep everything tidy (and to satisfy my developer OCD), I used Synx to synchronise the files and folders to match those used in the project.

That’s all that’s needed to get a Today widget up and running. I’m delighted it’s so straight forward and I’m looking forward to seeing what people do with them.

Aside

There’s an issue with the debugger in Xcode attaching to the extension process properly. You can manually attach it by selecting ‘Debug’->’Attach to Process’ and finding the extension process under ‘System’. If your extension crashes on startup you won’t be able to this.

If you want to see logging from before you reattached the debugger, you can view it in the system log. You can open it from ‘Debug’->’Open System Log…’. If you filter it by your extension’s bundle id you’ll get the relevant entries.

Update 18/6/2014: In the release notes for Xcode 6 Beta 2 there’s a list of issues around the debugger and extensions. One pertinent to this app is that you can’t debug a today widget in the simulator but you can on device.

Update 7/7/2014: Xcode 6 Beta 3 came out today and fixes some of the debugging issues.

Recommended Reading and Viewing

AWS SNS and “File type is not supported or file has been corrupted”

I spent a rather frustrating few hours this morning trying to get push notifications set up on Amazon’s Simple Notification Service.

In the Getting Started with APNS, there is a section on converting the p12 formatted file exported from the key chain and converting it into pem format.

If you try and use this pem file in the management console, the following error is returned:

File type is not supported or file has been corrupted

What you actually need to upload is the p12 version.

Another post in the Wisdom of the Ancients series.

Slides from the talk “Face Detection and Recognition for Fun and Profit” for XCake

These are the slides to my talk for XCake on using OpenCV for face recognition on iOS. It should be noted that the first half of the talk deals with using OpenCV to also detect faces and so applies to any platform you can use OpenCV on. The simplified code sample on slide 14 should more or less work for you on non-iOS implementations.

Links

Slide 4: https://en.wikipedia.org/wiki/Prosopagnosia

Slide 6: http://opencv.org/

Slide 9: http://coding-robin.de/2013/07/22/train-your-own-opencv-haar-classifier.html

Slide 10: http://docs.opencv.org/modules/contrib/doc/facerec/facerec_tutorial.html

Slide 25: http://www.rekognition.com/
https://www.bioid.com/solutions/solutions-by-application/bioid-for-facedotcom.html
http://api.animetrics.com
http://www.identitykit.it/
http://www.skybiometry.com/

Slide 27: https://github.com/kmonaghan/FaceRecognition

Other

520 – What’s New in Camera Capture from WWDC 2012 talks about CIDetector and AVCaptureMetadataOutput from about the 19 minute mark. You should look at the sample code from that talk (StacheCam) for details on how to implement CIDetector and AVCaptureMedataOutput rather than the SquareCam project referenced in the Apple Documentation.

iOS 6, Auto Layout and MKMapView

I’m currently in the throws of updating an app for iOS 7. As part of the update, I’m throwing out all the XIBs and buying fully into using auto layout programatically.

I’ve been concentrating on getting it all to work on iOS 7 and only started at looking at how it looks on iOS 6 this week. Straight away I hit an issue

Auto Layout still required after executing -layoutSubviews. MKMapView's implementation of -layoutSubviews needs to call super.

The solution turns out to fairly straight forward. You don’t seem to be able to directly apply constraints between a MKMapView and another subview under iOS 6. Instead, you place your map into a container view and set the autoresizingMask to flexible width and height. You can then apply any constraints needed to the container view.

The code below simply creates a MKMapView which takes up the whole screen. From there, you could add buttons to the container view that are constrained to float 30 points from the bottom (which is what I needed to do).

self.mapContainerView = [[UIView alloc] initWithFrame:CGRectZero];
self.mapContainerView.translatesAutoresizingMaskIntoConstraints = NO;

self.mapView = [[MKMapView alloc] initWithFrame:self.mapContainerView.frame];
self.mapView.showsUserLocation = YES;
self.mapView.delegate = self;
self.mapView.autoresizingMask = UIViewAutoresizingFlexibleWidth | UIViewAutoresizingFlexibleHeight;
[self.mapContainerView addSubview:self.mapView];

[self.view addSubview:self.mapContainerView];

[self.view addConstraints:[NSLayoutConstraint constraintsWithVisualFormat:@"|[_mapContainerView]|" options:0 metrics:nil views:NSDictionaryOfVariableBindings(_mapContainerView)]];

[self.view addConstraints:[NSLayoutConstraint constraintsWithVisualFormat:@"V:|[_mapContainerView]" options:0 metrics:nil views:NSDictionaryOfVariableBindings(_mapContainerView)]];

As an aside: Reveal has been invaluable in debugging my auto layout issues.

Your Broadsheet.ie Android app has arrived

Screenshot_2013-06-09-12-23-01

Finally, more than two and a half years after my iOS version was released I’ve built an Android app for Broadsheet.ie and it’s available now on the Google Play store.

The app doesn’t quite have feature parity with the iOS version but is close enough that it warrants release (especially considering the clamouring for it from the readers). I will be actively developing it over the summer in step with some updates to the iOS app.

The Android fragmentation issue means I’ve not been able to test it on all platforms, but I’ve made an effort to ensure it works on the top 10 devices that access the website. Hopefully the app won’t look too bad outside of these.

Think you can do better?

As with the iOS version of the app, the code is available on GitHub under the MIT license. I do this not in the hope that someone will come along and fix bugs or improve it but in case someone else finds it useful and wants to use it.

I would, of course, be delighted if someone actually did create a pull request…

And now over to you

The Android using section of our readers have been very vocal about wanting an app. When presented with evidence of lower engagement on the site from Android the lack of an app has been blamed (an opinion which I don’t subscribe too – it seems more like Android users don’t really use their devices compared to iOS).

The only way developers are going to take Android seriously is if people actually use their phones and download apps. So grab the app today and make this developer a happy man!

Eclipse, ADT, Maven, m2e, Android Connector setup

I’m looking at some Android development at the moment in work after being immersed in iOS development for the last few years. Switching tools always has a bit of a learning curve and this post documents what’ve setup so far. I’ve had a few false starts so this might come in useful to someone else.

Since pretty much everything I do these days app wise involved consuming some sort of REST API, I went looking for a library to handle that end of things. I came across Robospice which at first glance fits the bill for what I want. It uses Maven for project and dependency management.

As I’ve not really used Java I’ve never used Maven in anger and had some difficult in setting it up properly. While there are instructions out there, they all assume some working knowledge of how Eclipse, Maven or the ADT works so not ideal for a complete beginner. There was a lot of googling and reading Stack Overflow before it finally all worked.

Here’s the steps I followed to get it running on my iMac:

  • Download the Android SDK as the ADT bundle and install
  • Set the environment variable ANDROID_HOME to point to the sdk directory
  • Run ‘android update sdk –no-ui –all –force’ (android is under tools in the sdk folder. Also, this can take a while as it downloads everything)
  • Open ADT and install the Marketplace Client via ‘Install new software…’ under ‘Help’
  • Install Eclipse Plug-in Development Environment via ‘Install new software…’ under ‘Help’
  • Install M2E Plugin via ‘Install new software…’ under ‘Help’ using the URL http://download.eclipse.org/technology/m2e/releases
  • Install Maven 3 if you have an older version (or none) on your system (instructions on how to do so here)
  • Install Egit from the Eclipse Marketplace
  • Install Android Configurator from the Eclipse Marketplace (search for ‘android m2e’)

After all the restarts, you should be now at a stage where you can import Maven projects.

There’s a couple of more steps before you’re able to create a Maven project:

  • Start creating a new Maven Project
  • In ‘Select an Archetype’, click on ‘Add Archetype…’
  • Set ‘Archetype Group Id’ to ‘de.akquinet.android.archetypes’
  • Set ‘Archetype Artifact Id’ to ‘android-quickstart’
  • Set ‘Archetype Version’ to ‘1.0.8’

You can then continue on creating your project. Once it’s created you may see the error Project ‘skillpages-android’ is missing required source folder: ‘src/test/java’ “. This is a known issue and here’s two solutions to this:

  1. Create the directory and refresh the project
  2. Update the Android Configurator from the URL http://rgladwell.github.com/m2e-android/updates/master/

I will note that after I updated the plugin, it broke creating new projects for me.  But I’m not sure if that was something I did or an issue with it. I ended up removing and reinstalling it.

Hopefully this will help someone else bootstrap themselves into Android development and not just left fruitlessly searching.